


Let's explore the end-to-end process of a standard scan-to-BIM project, and learn the best practices for bringing existing buildings and structures into a building information modeling (BIM) framework.
This article outlines the best practices for bringing existing buildings and structures into a building information modeling (BIM) framework – otherwise known as scan-to-BIM – and unpacks some jargon along the way.
Uses for models made with scan-to-BIM range from as-built documentation to project renovations. They're also useful for comparisons with the original or as-built plans, topographic registration, and more.
If you're a laser scanning professional, you'll know that scan-to-BIM is attractive to your clients because it mitigates the margin of error at the survey stage, and reduces survey times and associated costs.
It can also cut down the time spent at the site by capturing the entire location in one session. if done properly, your customers will have an accurate virtual representation of their building, complete with a set of up-to-date models and plans.
Here, laser scanning professionals can find information on handling scan-to-BIM projects in 12 steps, based on recommendations from Autodesk University. Whether it's your first project or the next of many, these approaches apply to all experience levels.
The stages of a scan-to-BIM project
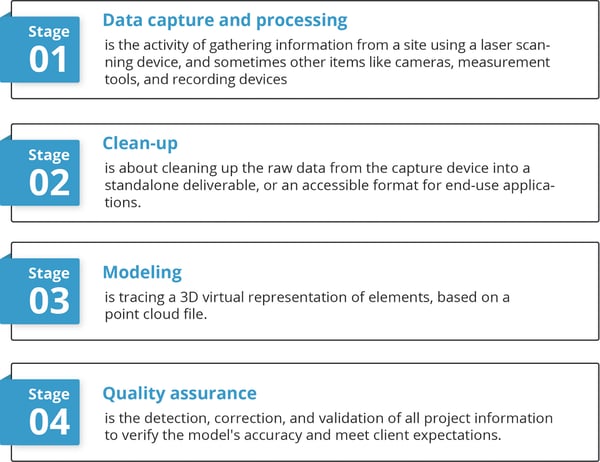
Broadly speaking, every scan-to-BIM project consists of four stages:
- Data capture and processing is the activity of gathering and storing information from a site using a laser scanning device, and sometimes other items like cameras, measurement tools, and recording devices.
- Clean-up is about refining the data retrieved from the capture device(s) into a standalone deliverable, like a point cloud, or an accessible format for end-use applications.
- Modeling is tracing a 3D virtual representation of the physical site, based on a point cloud file.
- Quality assurance is the detection, correction, and validation of all project information to verify the model's accuracy and meet client expectations.
Let's take a deep dive into these stages, highlighting individual considerations for data capture and processing, clean-up, modeling, and quality assurance.
1. Scope of work (SOW)
First things first, you need to ascertain the scope of work (SOW), a description of the work to be carried out. This SOW should have a timeline covering all the significant milestones, together with a deadline for completion.
A SOW lacking in detail can sometimes result in the contractor and the client having conflicting expectations over the final deliverable, e.g., the level of detail (LOD). Try to make this document as specific as possible.
2. Equipment
The next thing to think about is your choice of equipment. Which laser scanning device is right for the job? There's a broad selection on the market, each with a unique blend of features in terms of accuracy, portability, speed, and setup time.
The right device – or combination of devices – depends on carefully studying the SOW, and selecting technology that best suits the demands of the project and the schedule.
3. Operators
Then there's the person – or persons – operating the laser scanning device. Previous experience as a BIM modeler (or knowledge of the form the final deliverable should take) goes some way towards ensuring an optimal scanning performance.
A qualified operator can anticipate how site conditions impact the quality of the data capture, and won't neglect details like group control points or loop closures. This last detail is essential if using a device incorporating Simultaneous Localization and Mapping (SLAM) technology. If your operators will also be refining the data at a later stage, so much the better.
.jpg?width=840&height=560&name=M6PartnerCertification-8004%20(1).jpg)
4. Back up your data
It should go without saying, but we're going to say it anyhow; don't forget to back up your data at regular intervals during scanning and processing.
5. Time allocation
Processing times can be a real bottleneck in any scan-to-BIM project, so allocate time intelligently for data capture and processing. Analyze a sample of the data as early as possible so you can estimate how long the task takes overall, to help your project planning stay on track.
6. Hardware & software
For cleaning the deliverable, be aware that your team has to work with vast amounts of data. You'll need high-specification computer hardware and software to handle tasks like validating survey data, scan inspection, data clustering, and archiving.
Another point regarding software; the application should be broadly compatible with industry-standard file formats while still providing high-quality point clouds – without taking too long over it, either.
7. File sharing and access
If the scanning takes place in another city, country, or a different time-zone to yours, set up proper channels for information access for data clean-up. The size of the file determines the time it takes to upload or download from a file sharing service, or whether it needs splitting into smaller files. And if sending the file on a hard drive using a courier service, then these extra variables should be added to your project timeline and costs.

8. Communication
Clear lines of communication with your client are critical at the modeling stage of your scan-to-BIM project. If the SOW doesn't address the LOD, now is the time to confirm how much detail the model needs and the minimum acceptable margin of error.
9. Purpose
It's also helpful to understand the ultimate purpose of the model, whether it's for coordination, as-built documentation or digital floorplans, and adjust it accordingly. The client may even specify which bits of information it's safe to ignore – if a wall is being demolished, for example – which can save time in the modeling process. This step is vital if outsourcing the modeling work to a third party.
10. Test sample
An excellent way to instill confidence and establish lines of communication is to send over a test sample of the model. Model a small section of the project and send it over for evaluation. It allows the client to chime in with comments and feedback, and provide course corrections is necessary.
11. BIM software and point clouds
BIM software that can import point clouds play a role here, so the competence of your modeler is important. Much depends on the LOD required by the project and the client, but it helps if your modeler has prior experience in creating a BIM model using point clouds.

12. Checklist
The quality assurance of your deliverable relies upon you to develop a thorough checklist for detection, correction, and validation of the data. Such a checklist is especially helpful if outsourcing QA to a third-party.
If you start the process of QA further back in the project cycle, most critically with the SOW, then there's less work towards the end. Choosing the right software also plays a part; most of the market-leading applications offer built-in QA tools as standard.
Wrapping up
This article aims to provide a bird's-eye view of the end-to-end process in a standard scan-to-BIM project. Your clients understand that the potential applications and benefits of scan-to-BIM are plentiful, so it's worth the effort to learn good habits of best practice and quality assurance.
Better preparation at every stage of the scan-to-BIM workflow – not just an afterthought tacked onto the end of the project – results in fewer mistakes, which saves time, cost, and resources. Good luck in your next scan-to-BIM project – may it be the harbinger of many more to follow!
For a more detailed primer on scan-to-BIM, together with some context about BIM itself, you might be interested in reading another article in our series: Everything you need to know about scan-to-BIM.
In the meantime, you can also download our complimentary resource on using mobile mapping for CAD and BIM as-built documentation.