

3D laser scanning captures a lot of valuable real-world data, and that data has incredible potential to take not just objects but entire environments digital. The only problem is that the data captured by laser scanners is most often only accessible to professionals who know how to use point clouds and are trained in using the software that turns these point clouds into floorplans and BIM models.
NavVis IndoorViewer is a software that has been designed to make the 3D data captured by laser scanners accessible to a wider audience. With NavVis IndoorViewer, point clouds are turned into realistic, immersive experiences accessible in an intuitive web-based application.
The software was originally developed to visualize the data captured by the NavVis M6 Indoor Mobile Mapping System but after strong demand from users now fully supports point cloud files from static laser scanners. Full support means that a point cloud dataset can be uploaded to NavVis IndoorViewer and the software automatically converts it into a realistic, interactive 3D walkthrough. Keep reading to find out how to use NavVis IndoorViewer with static laser scanners.
NavVis IndoorViewer fully supports e57 point cloud files
NavVis IndoorViewer software is available as individual URL instances, and a single NavVis IndoorViewer instance supports the uploading of multiple scan datasets and scans from different devices. These datasets are combined within that single instance and converted into a virtual representation of anything from a building to an entire campus. Point clouds can be uploaded as .ptx, .ply, .pts, .xyz, and .e57 point cloud formats.
Since e57 point clouds are one of the most widely used formats, a feature was developed for NavVis IndoorViewer to extract or reconstruct panoramas from e57 point clouds captured by a static laser scanner. When you import a point cloud in e57 format, this feature renders fully immersive 360° walkthroughs from the point cloud data and, if available, images taken by the scanner. For this feature to work, the point cloud must contain structured and ideally organized color (RGB) information. If the e57 point cloud doesn’t contain color (RGB) information and it is only based on intensity values, it will still render black and white 360° walkthroughs.
How to import e57 files to NavVis IndoorViewer
1. Go to NavVis IndoorViewer Settings -> Dataset Management and find the heading “Import Point Clouds”.
.jpg?width=720&name=1_How-to-import%20(3).jpg)
2. Click on “Upload point cloud” to open your file browser.
.jpg?width=690&name=2_How-to-import%20(1).jpg)
3. Select the point cloud file(s) to import and click “Open”. Remember, the importer supports the following point cloud formats: .ptx, .ply, .pts, .xyz, and .e57 .
.jpg?width=690&name=3_How-to-import%20(1).jpg)
4. Choose the Dataset Location and wait for the importer to upload and process the file(s).

How you can benefit from uploading e57 files in NavVis IndoorViewer
Once NavVis IndoorViewer automatically converts e57 point cloud files into interactive, realistic 360° walkthroughs, you get a valuable deliverable that can be easily shared by sending a link. This feature is particularly relevant for stakeholders working on complex projects, where NavVis IndoorViewer enables remote access to the site and is used as a platform for collaboration and exchanging information. Users do not need to download or install a special software and they can move through the instance as if they were on site.Check out the example below of how an e57 point cloud can be used in NavVis IndoorViewer:
Here is what happens when it is uploaded to NavVis IndoorViewer:
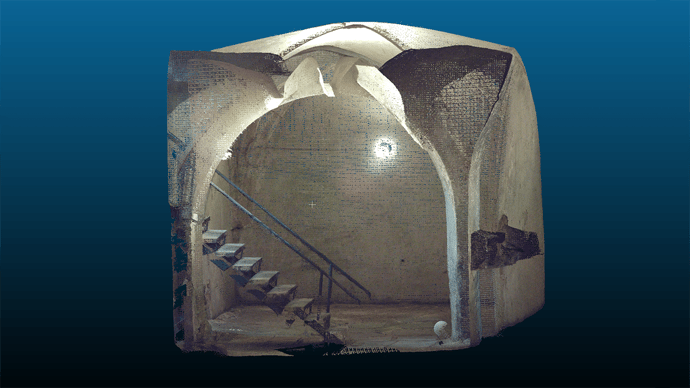
Before: e57 point cloud file, captured by a static laser scanner
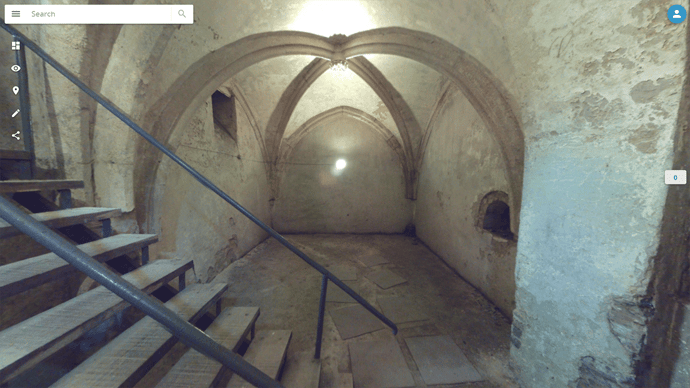
After: e57 point cloud file automatically converted into an immersive 360° walkthrough in NavVis IndoorViewer
Access the full functionality of NavVis IndoorViewer:
-
Provide high-resolution 360° panoramic images of a scanned site.
-
Add Points of Interest (interactive icons that could contain text, audio, video or even an entire webpage).
-
Measure distances between any two points.
-
Navigate through the point clouds by double-clicking.
For more information visit the NavVis IndoorViewer website.
